How To Use GitHub-GitHub essentials
- By: tanbits
- Category: web design & development
- Date: October 11, 2022

GitHub is a Git repository web hosting provider that offers a web-based graphical interface. It is the world’s biggest coding community. Putting a code or a project into GitHub provides it an increased exposure. Programmers can get source codes in many different languages and use the command-line interface, Git, to make and keep track of any changes.
GitHub is a Git repository web hosting provider that offers a web-based graphical interface. It is the world’s biggest coding community. Putting a code or a project into GitHub provides it an increased exposure. Programmers can get source codes in many different languages and use the command-line interface, Git, to make and keep track of any changes.
GitHub allows each crew member to work collectively on a project from any place, even when facilitating collaboration. You also can assess preceding variations created at an earlier point in time.
So now we understand what GitHub is. Time to benefit from higher know-how of the significance and relevance of GitHub.
Why We Use GitHub
GitHub provides you with a beautiful visual interface that helps you to track or manage your projects locally. After registering on GitHub, you can connect to social networks and create a strong profile.
GitHub allows software developers to work on the same file and update it simultaneously. GitHub documents the changes and reflects them in an organized manner to avoid any chaos among any of the uploaded files.
How to Start Working on a Project in GitHub?
Create the repository and the team
Any one member of the team is the leader of the team, as he/she is highly skilled in coding, so he/she creates a new repository to host the code for the SaaS product.
To create the repository, the team leader uses the GitHub web interface and clicks on the Repositories tab, after which at the New button, he/she names the potionfy repository & delivers a brief description and a Readme. md file.

After the creation of repository, the Team leader invites other members of the team to work on it. To do so, he/she clicks on the Settings tab in the repository, then in Manage access option, and eventually on the Add people button.
The team leader sends invites to other members by entering a member’s GitHub username (or e-mail address) alongside the pop-up window and clicking on Add member to this repository.
Aftre that, the team members accept the invitation and start preparations of working on the project. In case the invitation hyperlink does not work, members need to visit the team leader’s GitHub profile. They should click on the potionfy repository and accept the invitation there.
1. Create a file in GitHub
The team leader starts the project by creating the preliminary file of Potionfy SaaS product using: index.html.
In order to do so, he creates the file with the use of GitHub web interface by positioning himself in the repository and clicking on the Add file > Create new file button. Then he adds the name of the file, its content, and a significant dedicated message. After clicking on the Commit new file button, the file is created in the repository.

2. Create an issue and work on it
The team lead needs to move directly to work on marketing associated with the Potionfy launch. Therefore, the leader advises members to add an easy landing message to the index.html file. From there, he creates an issue in the repository by clicking on the Issues tab and clicking on the New issue button.
After the issue creation, the member examines it and allows the team lead to know what he could he be working on. He does it by leaving a remark and assigning the issue to himself. By working with this dynamic, the team will know who’s working on what.

3. Set up the local development environment
To work on the project’s index.html file, a Team member selects work locally, so he clones the potionfy repository in his development environment (the Linux virtual machine).
The first point before all this is setting up the SSH keys to work with GitHub. He will include it in the ssh-agent tutorial to do so. He then adds the key to his GitHub account, following the Adding a new SSH key for your GitHub account tutorial. Then, the members will open the leader repository on GitHub and copy the hyperlink to clone it.
Now in his local development environment, he creates a new directory wherein all his work would be centralized:
$ mkdir ~/development
$ cd ~/development
Finally, he clones the repository by typing git clone and pasting the code he simply copied from GitHub (that is the address of the repository). In this way, he now has a local copy of the repository and is prepared to begin working on it.

GitHub workflow
To work on a repository, this is the workflow GitHub recommends:
1. Create a branch in GitHub
As it is a good practice not to work directly on the master branch, the team member creates a new branch related to the issue he will be working on. He chooses to do this on a GitHub repository, but he can do the same in his local environment using Git commands.

2. Work on the branch locally
After the branch is created, members start working on it. The first thing they do is to pull off the entire repository through git pull so they can see the branch in the local development environment. With the new branch in his environment, he switches to it by using the git checkout command. After doing this, he makes sure it is working in the correct branch with the git branch command.
3. Solve the issue
The member start to work on the issue. To do this, he opens the index.html file and adds an h1 header to it. He adds the file to the staging place with the git add command and committs the change with git commit command. The subsequent step is to push the changes to repository by the git push command.
4. Create a pull request
A team member clicks on the Compare and pull request button in the GitHub repository (making sure his branch was selected in the branch left drop-down menu). This pull request will be analyzed by the team lead who will decide whether it can be merged into the master branch or not.
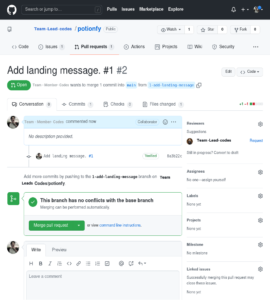
5. Merge your pull request & Delete your branch
The team lead will click on the Merge pull request to merge the changes into the master branch. Once, all the changes have been committed and there are no conflicts, he can delete the branch.
Wrap Up
In this blog, we learned how team members and the team leader decide to build a SaaS app, to build their potions online and share them with the rest of the world. They call it Potionfy.
The team lead can also create a remote repository and an issue to address the task of building a landing page. Also, he can decide how team members will work on that issue locally and create a pull request once they end up working on it.
BACK